简介
Bianbu 是为RISC-V架构的处理器深度优化的操作系统,基于Ubuntu社区源码构建,为进迭时空AI CPU提供系统底座。Bianbu为开发者和用户提供以下版本镜像:
- GNOME桌面版本: 原生桌面版,预装GNOME Shell桌面环境、Chromium、LibreOffice、MPV等应用。
- LXQt桌面版本: 基于LXQt重新设计和开发的轻桌面,用于轻量级,对资源占用和性能有要求的场景。
- 命令行版本: 最小系统版本,提供命令行界面。
为什么做Bianbu
- 为开发者提供一个针对RISC-V架构的处理器做了深度优化的操作系统
- 为客户提供系统解决方案,加速产品量产落地
- 驱动RISC-V硬件和软件生态系统发展
愿景
让我们的技术和服务遍布各行各业,遍布世界,服务每一个有需要的人。
系统架构
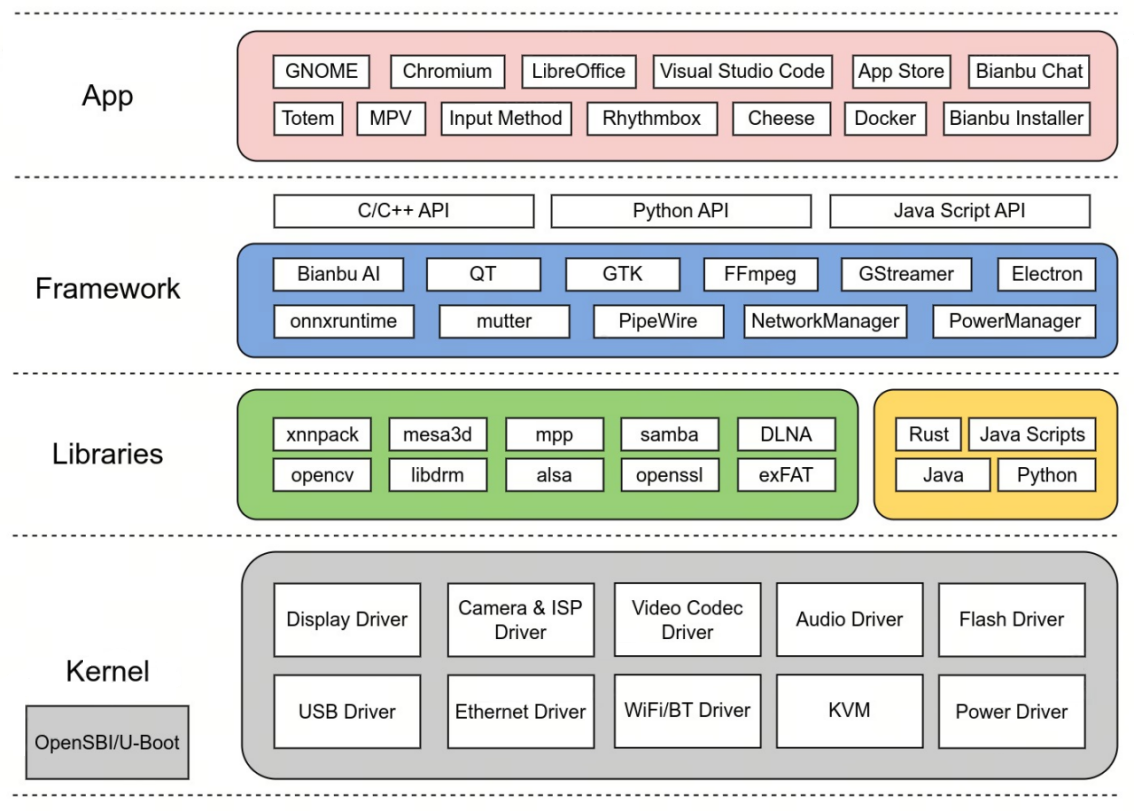
软件组件
以下是 Bianbu 的组件:
- 应用
- 框架
- 运行时
- 库
- Linux 内核
- U-Boot
- OpenSBI
Bianbu 通过 APT 软件源管理这些组件的软件包,软件包是标准的 debian 软件包格式。
应用
- GNOME/LXQt桌面及其常用应用
- 远程桌面
- Chromium 浏览器
- LibreOffice 办公套件
- Visual Studio Code
- Docker
框架
应用框架
- Electron
- GTK
- Qt
多媒体框架
- FFmpeg (支持硬件加速)
- GStreamer (支持硬件加速)
- PipeWire
推理框架
- onnxruntime (支持硬件加速)
运行时
- Python
- Java
- Node.js
- Rust
库
- OpenCV (支持 RVV 加速)
- OpenSSL (支持硬件加速)
- MPP (进迭时空多媒体处理平台,提供 C API 和示例)
- Mesa 3D
- OpenGLES/Vulkan/OpenCL
Linux 内核
Linux 内核负责管理处理器和其他硬件资源,提供用户和应用程序与硬件之间的接口。主要功能包括:
- 中断和时钟管理
- 进程管理
- 内存管理
- 文件系统管理
- 设备驱动管理
- 网络协议栈
支持版本与源码链接:
- 6.1: https://gitee.com/spacemit-buildroot/linux-6.1 (已停止维护 EOL)
- 6.6: https://gitee.com/spacemit-buildroot/linux-6.6 (长期支持 LTS)
U-Boot
U-Boot 是一个引导加载程序,负责初始化特定硬件,从介质(如 SD 卡、eMMC、SPI Flash、SSD、网络)加载 Linux 内核镜像、设备树和初始 RAM 文件系统。
-
版本:u-boot-2022.10
OpenSBI
OpenSBI 是 RISC-V 架构处理器的监管程序接口的实现,运行在 M 模式下的固件,提供引导加载程序、hypervisor、操作系统访问硬件的接口。
支持的设备
- BPI-F3
- Milk-V Jupiter
- MUSE Card
- MUSE Pi
- MUSE Pi pro
- MUSE Box
- MUSE Book
版本信息
-
Bianbu 1.0 【已经停止维护】 最新版本:v1.0.15
-
Bianbu 2.x 【K1长期维护版本】 最新版本:v2.2.1
-
Bianbu 3.x 最新版本:v3.0.1