6.6.2 Isaac Sim Simulation Navigation
Last Version: 19/09/2025
This guide explains how to set up and use Isaac Sim on a GPU server with Isaac ROS in a Docker container for navigation simulation.
⚠️ Environment Note:
- Isaac Sim runs on a GPU server, while Isaac ROS operates in a Docker container (e.g., isaac-ros-dev) deployed on the same GPU server.
- Official Tutorial: Isaac ROS Official Example
Isaac ROS Occupancy Grid Localizer Introduction
This example uses the Isaac ROS Occupancy Grid Localizer for map localization and standard Nav2 for navigation.
The Occupancy Grid Localizer is a module that uses a known grid map and laser sensor data to determine the robot’s 2D pose on the map.
Isaac ROS Occupancy Grid Localizer Design:

The localizer has two Key Nodes:
- Occupancy Grid Localizer Node: Matches LiDAR data to the grid map for positioning (provided by NVIDIA).
- Laser Scan to FlatScan Node: Converts 2D/3D LiDAR data into Isaac ROS’s standard format.
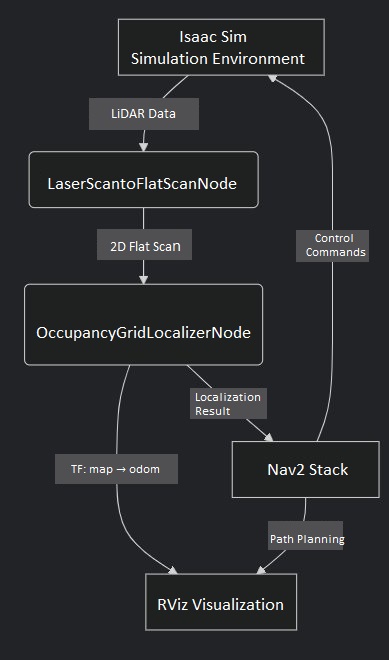
Simulation Flow
Preparation
Step 1: Download Offline Resources
Log in to the AI server and download the resource package for the Isaac ROS Occupancy Grid Localizer:
NGC_ORG="nvidia"
NGC_TEAM="isaac"
PACKAGE_NAME="isaac_ros_occupancy_grid_localizer"
NGC_RESOURCE="isaac_ros_occupancy_grid_localizer_assets"
NGC_FILENAME="quickstart.tar.gz"
MAJOR_VERSION=3
MINOR_VERSION=2
VERSION_REQ_URL="https://catalog.ngc.nvidia.com/api/resources/versions?orgName=$NGC_ORG&teamName=$NGC_TEAM&name=$NGC_RESOURCE&isPublic=true&pageNumber=0&pageSize=100&sortOrder=CREATED_DATE_DESC"
AVAILABLE_VERSIONS=$(curl -s \
    -H "Accept: application/json" "$VERSION_REQ_URL")
LATEST_VERSION_ID=$(echo $AVAILABLE_VERSIONS | jq -r "
    .recipeVersions[]
    | .versionId as \$v
    | \$v | select(test(\"^\\\\d+\\\\.\\\\d+\\\\.\\\\d+$\"))
    | split(\".\") | {major: .[0]|tonumber, minor: .[1]|tonumber, patch: .[2]|tonumber}
    | select(.major == $MAJOR_VERSION and .minor <= $MINOR_VERSION)
    | \$v
    " | sort -V | tail -n 1
)
if [ -z "$LATEST_VERSION_ID" ]; then
    echo "No corresponding version found for Isaac ROS $MAJOR_VERSION.$MINOR_VERSION"
    echo "Found versions:"
    echo $AVAILABLE_VERSIONS | jq -r '.recipeVersions[].versionId'
else
    mkdir -p ${ISAAC_ROS_WS}/isaac_ros_assets && \
    FILE_REQ_URL="https://api.ngc.nvidia.com/v2/resources/$NGC_ORG/$NGC_TEAM/$NGC_RESOURCE/\
versions/$LATEST_VERSION_ID/files/$NGC_FILENAME" && \
    curl -LO --request GET "${FILE_REQ_URL}" && \
    tar -xf ${NGC_FILENAME} -C ${ISAAC_ROS_WS}/isaac_ros_assets && \
    rm ${NGC_FILENAME}
fi
Step 2: Install/Compile Isaac ROS Occupancy Grid Localizer
Enter the isaac-ros-dev environment and install or compile the isaac-ros-occupancy-grid-localizer package.
-
Option 1: Install Precompiled Package:
sudo apt-get update
sudo apt-get install -y ros-humble-isaac-ros-occupancy-grid-localizer -
Option 2: Compile from Source:
cd ${ISAAC_ROS_WS}/src
git clone -b release-3.2 https://github.com/NVIDIA-ISAAC-ROS/isaac_ros_map_localization.git isaac_ros_map_localization

sudo apt-get update
rosdep update && rosdep install --from-paths ${ISAAC_ROS_WS}/src/isaac_ros_map_localization/isaac_ros_occupancy_grid_localizer --ignore-src -y

cd ${ISAAC_ROS_WS}
colcon build --symlink-install --packages-up-to isaac_ros_occupancy_grid_localizer --base-paths ${ISAAC_ROS_WS}/src/isaac_ros_map_localization/isaac_ros_occupancy_grid_localizer

source install/setup.bash
Launching the Simulation
Run the simulation on the GPU server.
Step 1: Start Isaac Sim
cd issacsim
./isaac-sim.sh
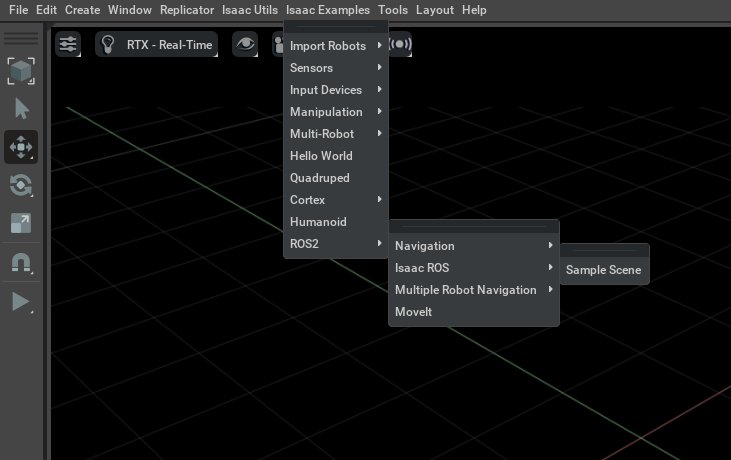
Step 2: Load Scene and AGV Model
Refer to: https://nvidia-isaac-ros.github.io/getting_started/isaac_sim/index.html
Step 3: Adjust Topic Name
- In the right Stage panel, select
/World/Nova_Carter_ROS/ros_lidars/publish_front_2d_lidar_scan. - Change the 2D LiDAR topic name to
/scanto match Nav2’s standard interface.
Step 4: Enable LiDAR
- In the right Stage panel, select
/World/Nova_Carter_ROS/ros_lidars/front_2d_lidar_render_product. - Check the enabled box under Inputs to activate 2D LiDAR output, allowing ROS 2 nodes to receive simulated data.
Step 5: Start Simulation
Click the PLAY button on the left side to start the scene, power on the robot and sensors, and begin data collection and topic publishing. The controller is now ready to receive commands (e.g., velocity from Nav2).
Launching Navigation
Launch the Nav2 navigation stack with occupancy grid localization:
ros2 launch isaac_ros_occupancy_grid_localizer isaac_ros_occupancy_grid_localizer_nav2.launch.py
The above script launches the navigation script for isaac_ros_occupancy_grid_localizer and starts the following nodes:
| Node/Component | Description |
|---|---|
rviz_launch | Launches RViz and loads the pre-configured visualization UI |
nav2_bringup_launch | Launches the core Nav2 components, (controllers, planners, costmaps, etc.) |
OccupancyGridLocalizerNode | NVIDIA's occupancy grid localizer, matches LiDAR data to the grid map for localization |
LaserScantoFlatScanNode | Converts 3D/2D LiDAR data into FlatScan format for the localizer |
static_transform_publisher | Publishes a static TF from base_link to base_footprint |
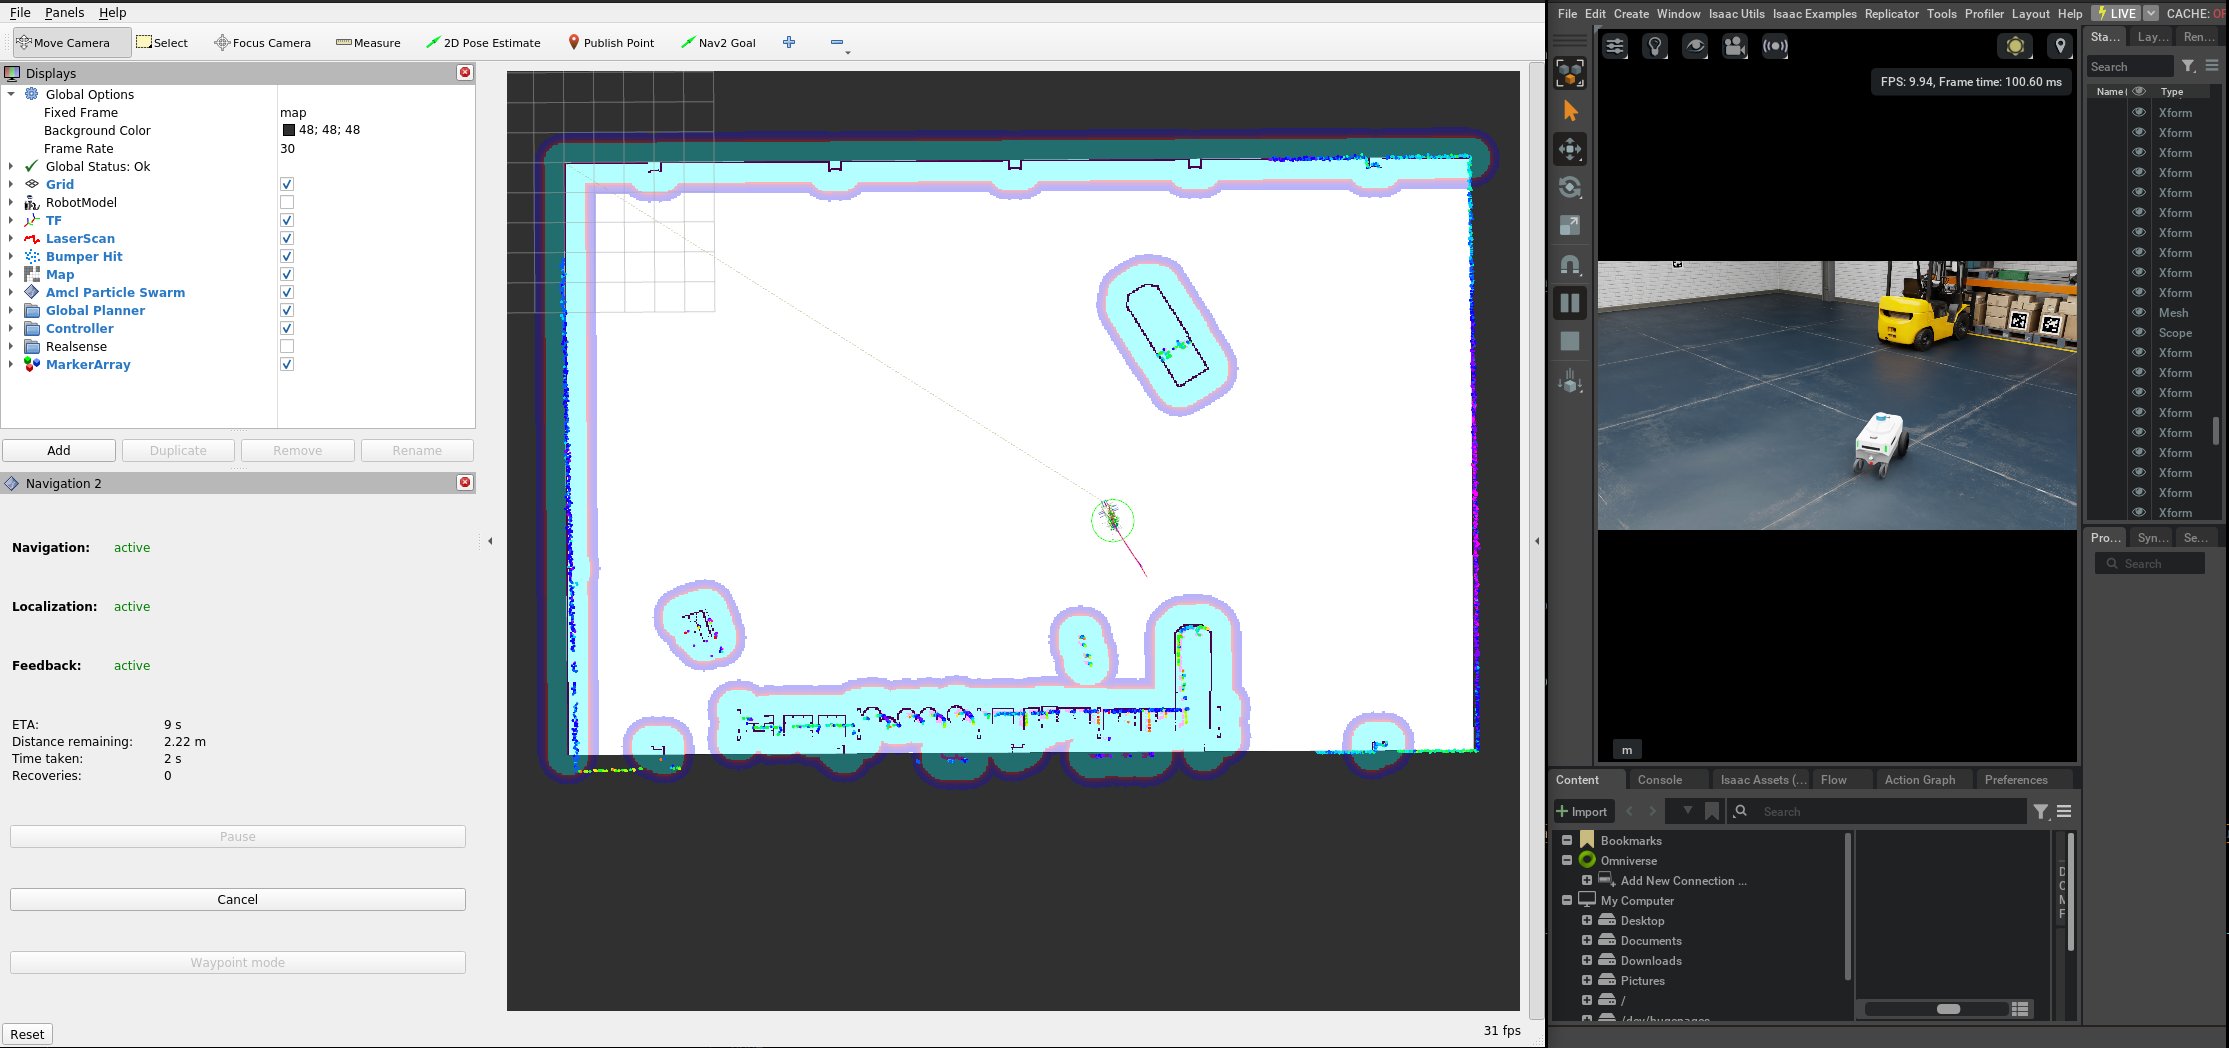
After launching, run the localization service once to set the robot’s initial position:
ros2 service call /trigger_grid_search_localization std_srvs/srv/Empty {}
Once localized, in the RViz view, click Nav2 Goal, select a point on the map, and Nav2 will plan a route. The controller will drive the robot along the path: