4.4 YOLOv8 Training and Deployment Pipeline
Last Version: 11/09/2025
This guide uses YOLOv8 as an example to explain the complete workflow: model training, quantization, and final inference deployment.
Model Training
Training Environment Setup
-
Clone the source code:
git clone https://github.com/ultralytics/ultralytics -
Install Dependencies:
cd ultralytics
pip install -e .
If you encounter network issues downloading dependencies, you can use the Tsinghua mirror site for installation: https://pypi.tuna.tsinghua.edu.cn/simple/
Model Training and Export
The following code example demonstrates how to train a YOLOv8 model and export it to ONNX format:
from ultralytics import YOLO
#Load a COCO-pretrained YOLOv8n model
model = YOLO("yolov8n.yaml")
#Load a pretrained YOLO model (recommended for training)
model = YOLO("yolov8n.pt")
#Train the model using the 'coco8.yaml' dataset for 100 epochs
results = model.train(data="coco8.yaml", epochs=100)
#Export the model to ONNX format
success = model.export(format="onnx",imgsz=(320,320),simplify=True,opset=13)
Key Parameter Explanation:
yolov8n.yaml: Model configuration file.coco8.yaml: Training dataset configuration file. It must include two parts:images: Directory containing training and validation set images.labels: Directory containing the corresponding annotation files for the images.
Annotation File (labels) Format (Each line represents one target object):
<class_id> <x_center> <y_center> <width> <height>
Example:
0 0.445688 0.480615 0.075125 0.117295
0 0.640086 0.471742 0.0508281 0.0814344
20 0.643211 0.558852 0.129828 0.097623
class_id: The target's class ID (integer).- The subsequent four floating-point numbers represent the target's normalized bounding box coordinates in the order:
x_center: Normalized x-coordinate of the bounding box center.y_center: Normalized y-coordinate of the bounding box center.width: Normalized width of the bounding box.height: Normalized height of the bounding box.
Note: For fine-tuning on your private dataset, start from a pretrained model and prepare your data following the
coco8.yamlformat.
Model Quantization (on x86 Platforms)
Important: Perform quantization on an x86 machine.
Quantization Tool Installation
-
Download the Quantization Tool: xquant-1.2.1 Download Link
-
Install the Tool:
pip install xquant-1.2.1-py3-none-any.whl -
Verify Installation:
pip show xquantSuccessful installation output example:

Quantization Configuration
Calibration Dataset Download: Calibration Dataset
Example quantization configuration file:
{
  "model_parameters": {
    "onnx_model": "path/yolov8n.onnx",
    "working_dir": "yolov8",
    "skip_onnxsim": false
  },
  "calibration_parameters": {
    "input_parameters": [
      {
        "mean_value": [0, 0, 0],
        "std_value": [255, 255, 255],
        "color_format": "rgb",
        "data_list_path": "path/calib_list.txt"
      }
    ]
  },
  "quantization_parameters": {
    "truncate_var_names": [
      "/model.22/Reshape_output_0",
      "/model.22/Reshape_1_output_0",
      "/model.22/Reshape_2_output_0"
    ]
  }
}
Parameter Explanation:
onnx_model: Path to the ONNX model to be quantized.mean_valueandstd_value: Image normalization parameters. Must match the configuration used during training.color_format: Color channel order (e.g.,rgborbgr).data_list_path: Path to the file listing calibration images.truncate_var_names: Names of nodes where quantization should be truncated (to prevent quantization error from affecting post-processing).
Calibration List File Example (calib_list.txt):
path/000000428562.jpg
path/000000000632.jpg
path/000000157756.jpg
path/000000044279.jpg
pathcan be either a relative (relative to the config file location) or absolute path.
Note: It is recommended to use a subset of your training images for calibration to maintain consistent data distribution.
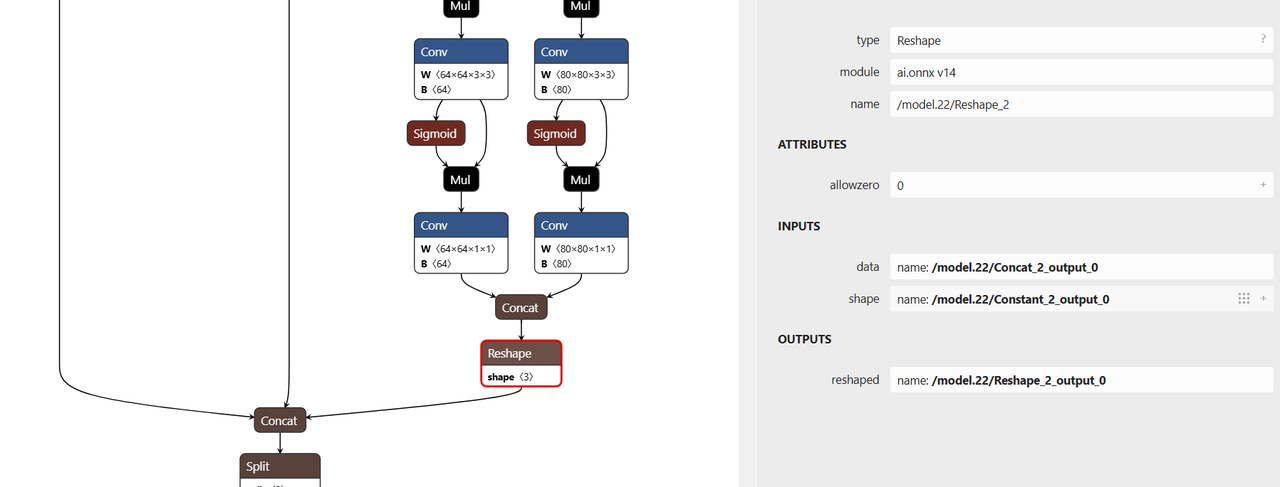
Truncation Node Identification
- The
truncate_var_namesparameter specifies nodes for truncation. - YOLOv8 models include post-processing (coordinate decoding) logic.
- Truncating the model before these nodes helps prevent quantization errors from degrading post-processing accuracy.
Example:
"truncate_var_names": [
  "/model.22/Reshape_output_0",
  "/model.22/Reshape_1_output_0",
  "/model.22/Reshape_2_output_0"
]
Use the Netron visualizer to open your yolov8n.onnx model, inspect the graph, and confirm the names of the nodes that should be truncated or excluded from quantization.
Run Quantization
Run the following command to perform quantization:
python3 -m xquant --config path/yolov8_xquant_config.json
Upon successful quantization, the output model (e.g., yolov8n.q.onnx) will be generated.
Model Inference
-
Download Example Inference Code
git clone https://gitee.com/bianbu/spacemit-demo.git -
Navigate to the YOLOv8 Example Directory
cd spacemit-demo/examples/CV/yolov8 -
Environment Setup (Example)
# Navigate to the python subdirectory
cd python
sudo apt install python3-pip python3-venv

# Create and activate a virtual environment
python3 -m venv <venv_name>
source name/bin/activate

# Install Python dependencies
pip install -r requirements.txt --index-url https://git.spacemit.com/api/v4/projects/33/packages/pypi/simple -
Run Inference
python test_yolov8.py --model <quantized_model_path> --image <test_image_path>Example Command:
python test_yolov8.py --model ./yolov8n.q.onnx --image ./test_image.jpgUpon successful execution, the script will typically output a result image (e.g.,
result.jpg) and print the detected object information to the terminal.