6.1.2 ROS2 Installation & Usage
Last Version: 11/09/2025
Platform Requirements
If you are using Bianbu ROS (ROS 2 is pre-installed), you can skip this step.
For other systems, follow these steps:
- Enable SpacemiT ROS 2 repository and update package lists.
- Install ROS 2 base or development tools as needed.
- Create a workspace to build and run custom packages.
- Work with existing ROS 2 packages (install, launch, and test nodes).
This prepares your system for developing, building, and running ROS 2 applications on SpacemiT platforms.
Hardware: SpacemiT RISC-V hardwares OS: bianbu-desktop / bianbu-star
Configure Software Repository
Execute the following command in terminal to enable SpacemiT's ROS2 software repository:
grep -q '^Suites:.*\bnoble-ros\b' /etc/apt/sources.list.d/bianbu.sources || sudo sed -i '0,/^Suites:/s//& noble-ros/' /etc/apt/sources.list.d/bianbu.sources
sudo apt update
Installation Tools
Install Development Tools (Recommended)
If you need to build ROS 2 packages or perform secondary development, it is recommended to install the development tools:
sudo apt update && sudo apt install ros-dev-tools
Install ROS-Base
The base version includes core communication libraries, message interfaces, and command-line tools — but no GUI:
sudo apt install ros-humble-ros-base
Building Custom ROS2 Packages
Create a Workspace
Create a directory for your ROS2 workspace and source folder:
mkdir -p ~/ros2_demo_ws/src
Load ROS2 Environment Variables
Source the ROS2 environment to make ROS2 commands available:
source /opt/ros/humble/setup.zsh
Note: If using a Bash terminal, replace setup.zsh with setup.bash.
Create Python Publisher/Subscriber Example Package
Create a new package named py_pubsub:
cd ~/ros2_demo_ws/src
ros2 pkg create --build-type ament_python --license Apache-2.0 py_pubsub
After successful creation, ROS2 will automatically generate the required package structure.
Write Publisher Node
Create the file:
cd ~/ros2_demo_ws/src/py_pubsub/py_pubsub
vim publisher_member_function.py
Paste the following code:
import rclpy                              # Import ROS2 Python client library
from rclpy.node import Node               # Import Node class from rclpy for node creation
from std_msgs.msg import String           # Import standard string message type (std_msgs/String)

# Define a class inheriting from Node for creating publisher node
class MinimalPublisher(Node):

    def __init__(self):
        super().__init__('minimal_publisher')          # Initialize parent class and set node name to "minimal_publisher"
        self.publisher_ = self.create_publisher(       # Create a publisher with message type String
            String,                                    # Message type is std_msgs/String
            'topic',                                   # Topic name is "topic"
            10                                         # Queue size of 10 to buffer outgoing messages
        )
        timer_period = 0.5                             # Set timer period to 0.5 seconds
        self.timer = self.create_timer(                # Create timer to trigger callback every 0.5 seconds
            timer_period,
            self.timer_callback
        )
        self.i = 0                                     # Initialize counter for message sequencing

    def timer_callback(self):
        msg = String()                                 # Create String message object
        msg.data = 'Hello World: %d' % self.i          # Set message content with current count
        self.publisher_.publish(msg)                   # Publish message to "topic"
        self.get_logger().info('Publishing: "%s"' % msg.data)  # Log published message to terminal
        self.i += 1                                    # Increment counter for next message

# main function is the program entry point
def main(args=None):
    rclpy.init(args=args)                              # Initialize rclpy

    minimal_publisher = MinimalPublisher()             # Create MinimalPublisher node instance

    rclpy.spin(minimal_publisher)                      # Keep node running to process callbacks

    minimal_publisher.destroy_node()                   # Clean up node resources before exit
    rclpy.shutdown()                                   # Shut down rclpy system

# Execute main() if run as standalone script
if __name__ == '__main__':
    main()
Add Dependencies
Add runtime dependencies to package.xml:
cd ~/ros2_demo_ws/src/py_pubsub
vim package.xml
Add the following dependencies after <license>Apache-2.0</license>:
<exec_depend>rclpy</exec_depend>
<exec_depend>std_msgs</exec_depend>
Configure Entry Points
Edit the setup.py file to ensure package metadata like maintainer and license match package.xml:
maintainer='YourName',
maintainer_email='you@email.com',
description='Examples of minimal publisher/subscriber using rclpy',
license='Apache-2.0',
Add the publisher entry point in entry_points:
entry_points={
    'console_scripts': [
        'talker = py_pubsub.publisher_member_function:main',
    ],
},
Verify setup.cfg Configuration
Ensure the setup.cfg content matches the following (it should be correctly generated by default):
[develop]
script_dir=$base/lib/py_pubsub
[install]
install_scripts=$base/lib/py_pubsub
Implement Subscriber Node
Create the subscriber file:
cd ~/ros2_demo_ws/src/py_pubsub/py_pubsub
vim subscriber_member_function.py
Paste the following code:
import rclpy                            # Import ROS2 Python client library
from rclpy.node import Node             # Import Node class from rclpy.node for node definition
from std_msgs.msg import String         # Import standard message type String (std_msgs/String)

# Define a Node-inherited class: MinimalSubscriber (Minimal Subscriber Example)
class MinimalSubscriber(Node):

    def __init__(self):
        super().__init__('minimal_subscriber')   # Initialize parent class with node name "minimal_subscriber"

        # Create subscriber to topic 'topic' with String message type and queue size 10
        self.subscription = self.create_subscription(
            String,                              # Message type: std_msgs/String
            'topic',                             # Subscribed topic name: 'topic'
            self.listener_callback,              # Callback function when message received
            10                                  # Message queue size
        )

        self.subscription  # Prevent unused variable warning (optional, for linting purposes)

    # Callback function: invoked whenever a message is received
    def listener_callback(self, msg):
        # Print received message to terminal
        self.get_logger().info('Received: "%s"' % msg.data)

# main() function serves as program entry point
def main(args=None):
    rclpy.init(args=args)                       # Initialize ROS2 client functionality

    minimal_subscriber = MinimalSubscriber()    # Create MinimalSubscriber node instance

    rclpy.spin(minimal_subscriber)              # Keep node alive to process messages and callbacks
    # Explicit node destruction (optional, typically called before program exit)
    minimal_subscriber.destroy_node()
    rclpy.shutdown()                            # Shutdown ROS2 client functionality

# Execute main() if run as standalone script
if __name__ == '__main__':
    main()
The subscriber node is almost identical to the publisher node in structure. Its constructor creates a subscriber using the same parameters as the publisher.
Important: For the publisher and subscriber to communicate, they must use the same topic name and message type.
Key differences in the subscriber implementation
- No timer needed – the callback runs as soon as a message is received.
- Simpler lifecycle – no need for periodic publishing logic.
- Same dependencies – no extra changes to
package.xmlare required. - Same configuration – the existing
setup.cfgremains valid.
Add Subscriber Entry Point
Edit setup.py under entry_points to include the subscriber entry point below the publisher:
entry_points={
    'console_scripts': [
        'talker = py_pubsub.publisher_member_function:main',
        'listener = py_pubsub.subscriber_member_function:main',
    ],
},
Build and Run the Package
-
Build the package:
cd ~/ros2_demo_ws/
source /opt/ros/humble/setup.zsh
colcon build --packages-select py_pubsub -
Run the Publisher Node:
source /opt/ros/humble/setup.zsh
source ~/ros2_demo_ws/install/setup.zsh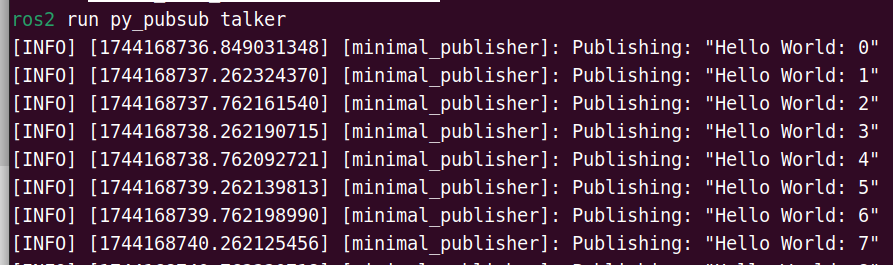
ros2 run py_pubsub talker -
Run the Subscriber Node (in a new terminal):
source /opt/ros/humble/setup.zsh
source ~/ros2_demo_ws/install/setup.zsh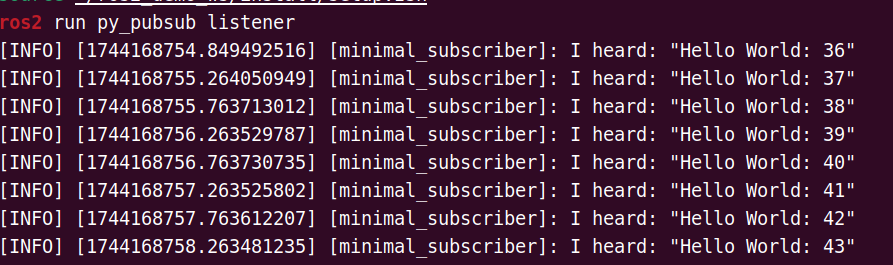
ros2 run py_pubsub listener -
Verify output in terminals:
Publisher Output:
Subscriber Output:
Working with Existing ROS2 Packages
This section demonstrates how to utilize pre-existing ROS2 packages, using the USB camera driver as a practical example.
Install usb-cam Driver Package
sudo apt update
sudo apt install ros-humble-usb-cam
source /opt/ros/humble/setup.zsh
Check USB Camera Device ID
Before connecting the USB camera, list the current video devices:
ls /dev/video*
Sample output:
/dev/video0   /dev/video11  /dev/video14  /dev/video17  /dev/video2  /dev/video5   /dev/video6  /dev/video9
/dev/video1   /dev/video12  /dev/video15  /dev/video18  /dev/video3  /dev/video50  /dev/video7  /dev/video-dec0
/dev/video10  /dev/video13  /dev/video16  /dev/video19  /dev/video4  /dev/video51  /dev/video8
Verify USB Camera Connection
After connecting the USB camera, run the command again:
ls /dev/video*
Sample output with new devices:
/dev/video0   /dev/video11  /dev/video14  /dev/video17  /dev/video2   /dev/video3  /dev/video50  /dev/video7  /dev/video-dec0
/dev/video1   /dev/video12  /dev/video15  /dev/video18  /dev/video20  /dev/video4  /dev/video51  /dev/video8
/dev/video10  /dev/video13  /dev/video16  /dev/video19  /dev/video21  /dev/video5  /dev/video6   /dev/video9
New device nodes /dev/video20 and /dev/video21 represent the connected USB camera interfaces.
Launch USB Camera Node
Run the USB camera driver, specifying the correct device ID:
ros2 run usb_cam usb_cam_node_exe --ros-args -p video_device:="/dev/video20"
If the node starts successfully, the terminal will show initialization details such as resolution, and frame rate. Example output:
[INFO] [1744172544.075291448] [usb_cam]: camera_name value: default_cam
[WARN] [1744172544.075853419] [usb_cam]: framerate: 30.000000
[INFO] [1744172544.091075111] [usb_cam]: using default calibration URL
[INFO] [1744172544.091334950] [usb_cam]: camera calibration URL: file:///home/zq-pi3/.ros/camera_info/default_cam.yaml
[ERROR] [1744172544.091760085] [camera_calibration_parsers]: Unable to open camera calibration file [/home/zq-pi3/.ros/camera_info/default_cam.yaml]
[WARN] [1744172544.091881755] [usb_cam]: Camera calibration file /home/zq-pi3/.ros/camera_info/default_cam.yaml not found
Could not retrieve device capabilities: `/dev/v4l-subdev0`
[INFO] [1744172544.235730013] [usb_cam]: Starting 'default_cam' (/dev/video20) at 640x480 via mmap (yuyv) at 30 FPS
[swscaler @ 0x2ad6488640] No accelerated colorspace conversion found from yuv422p to rgb24.
This device supports the following formats:
    YUYV 4:2:2 640 x 480 (30 Hz)
    YUYV 4:2:2 640 x 480 (25 Hz)
    YUYV 4:2:2 640 x 480 (20 Hz)
    YUYV 4:2:2 640 x 480 (15 Hz)
    YUYV 4:2:2 640 x 480 (10 Hz)
    YUYV 4:2:2 640 x 480 (5 Hz)
[INFO] [1744172544.255035217] [usb_cam]: Setting 'brightness' to 50
unknown control 'white_balance_temperature_auto'

[INFO] [1744172544.288086828] [usb_cam]: Setting 'white_balance_temperature_auto' to 1
[INFO] [1744172544.288310083] [usb_cam]: Setting 'exposure_auto' to 3
unknown control 'exposure_auto'

[INFO] [1744172544.303411938] [usb_cam]: Setting 'focus_auto' to 0
View Images on Host Machine
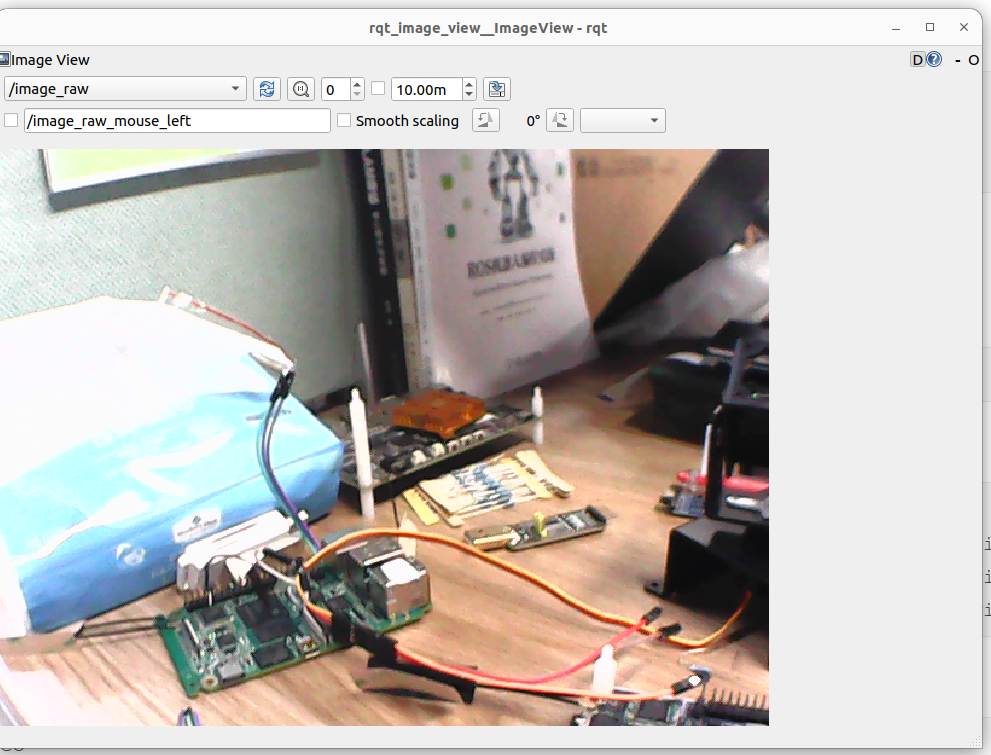
Ensure that the host has installed ROS2 Humble and subscribe to the images captured by the USB camera using the rqt_image_view tool:
source /opt/ros/humble/setup.bash
ros2 run rqt_image_view rqt_image_view
In the pop-up window, select the /image_raw topic to view the camera feed:
Install Bianbu Robot Dependencies
To use the Bianbu Robot SDK more efficiently, it is recommended to install the following dependencies:
sudo apt install -y ros-humble-camera-info-manager libopencv-dev ros-humble-image-transport ros-humble-ros2-control ros-humble-hardware-interface \
libopenblas-dev portaudio19-dev ffmpeg python3-spacemit-ort libcjson-dev libasound2-dev libboost-all-dev libbenchmark-dev ros-humble-diagnostic-updater \
libcjson-dev libasound2-dev ros-humble-libg2o ros-humble-dwb-critics libg2o-dev libsuitesparse-dev ros-humble-nav2-costmap-2d \
python3-opencv ros-humble-cv-bridge autoconf automake libtool ros-humble-pcl-ros
Summary
This tutorial installed the minimal required components for ROS2 Humble.
To extend functionality, you may install additional packages as needed:
sudo apt install ros-humble-<package-name>
For more tutorials, please refer to the official documentation of ROS2: https://docs.ros.org/en/humble/Tutorials.html