YOLO
Last Version: 12/09/2025
YOLO Model Overview
This example shows how to run YOLO-series object-detection inference on SpacemiT NPU, using either images or a live video stream as input, and then publish the results (object classes + bounding-box coordinates) via ROS 2.
Supported Model Versions
- YOLOv5
- YOLOv6
- YOLOv8
- YOLOv11 (and others)
ONNX models can be downloaded from ⭐ Bianbu AI Demo Zoo All models are trained on the COCO dataset and can recognize 80 common object classes (people, animals, fruits, vehicles, etc.).
Advantages
- Fast inference
- High accuracy & generalization
- Easy deployment, low resource usage
Use-Cases
- Autonomous driving – pedestrian & vehicle detection
- Smart home – garbage classification, surveillance
- Smart security – abnomaly detection, fall detection
Environment Setup
Platform Requirements
SpacemiT RISC-V:
- Pre-flashed with the Bianbu ROS system image
Install Dependencies
Run the following command to install required libraries and tools:
sudo apt install python3-opencv ros-humble-cv-bridge ros-humble-camera-info-manager \
ros-humble-image-transport python3-spacemit-ort python3-yaml libyaml-dev python3-numpy
Import ROS 2 Environment
Set up your ROS 2 environment:
source /opt/bros/humble/setup.bash
Model Configuration Check
Run the following command to list the model configurations currently supported on your system:
ros2 launch br_perception infer_info.launch.py | grep 'detection'
Sample output:
  - config/detection/yolov8.yaml
  - config/detection/yolov6.yaml
  - config/detection/yolov11_640.yaml
  - config/detection/yolov5.yaml
  - config/detection/yolov11_320.yaml
During subsequent inference, set config_path to one of these .yaml files to select the desired YOLO model.
Running Inference on an Image
Prepare the Image
Copy a test image to your current folder:
cp /opt/bros/humble/share/jobot_infer_py/data/detection/test.jpg .
Save Inference Results Locally
ros2 launch br_perception infer_img.launch.py \
  config_path:='config/detection/yolov6.yaml' \
  img_path:='./test.jpg'
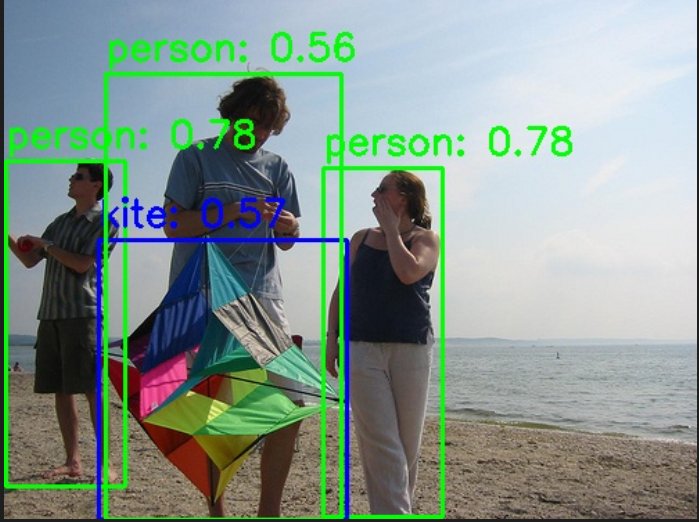
The processed output will be saved as det_result.jpg in your specified output directory.
Viewing Inference Results in a Web Browser
Launch Inference Server in Terminal 1:
ros2 launch br_perception infer_img.launch.py \
  config_path:='config/detection/yolov6.yaml' \
  img_path:='./test.jpg' \
  publish_result_img:=true \
  result_img_topic:='result_img' \
  result_topic:='/inference_result'
Launch the web visualization tool in a new Terminal 2:
ros2 launch br_visualization websocket_cpp.launch.py image_topic:='/result_img'
The terminal will prompt the browser address:
...
Please visit in your browser: http://<IP>:8080
...
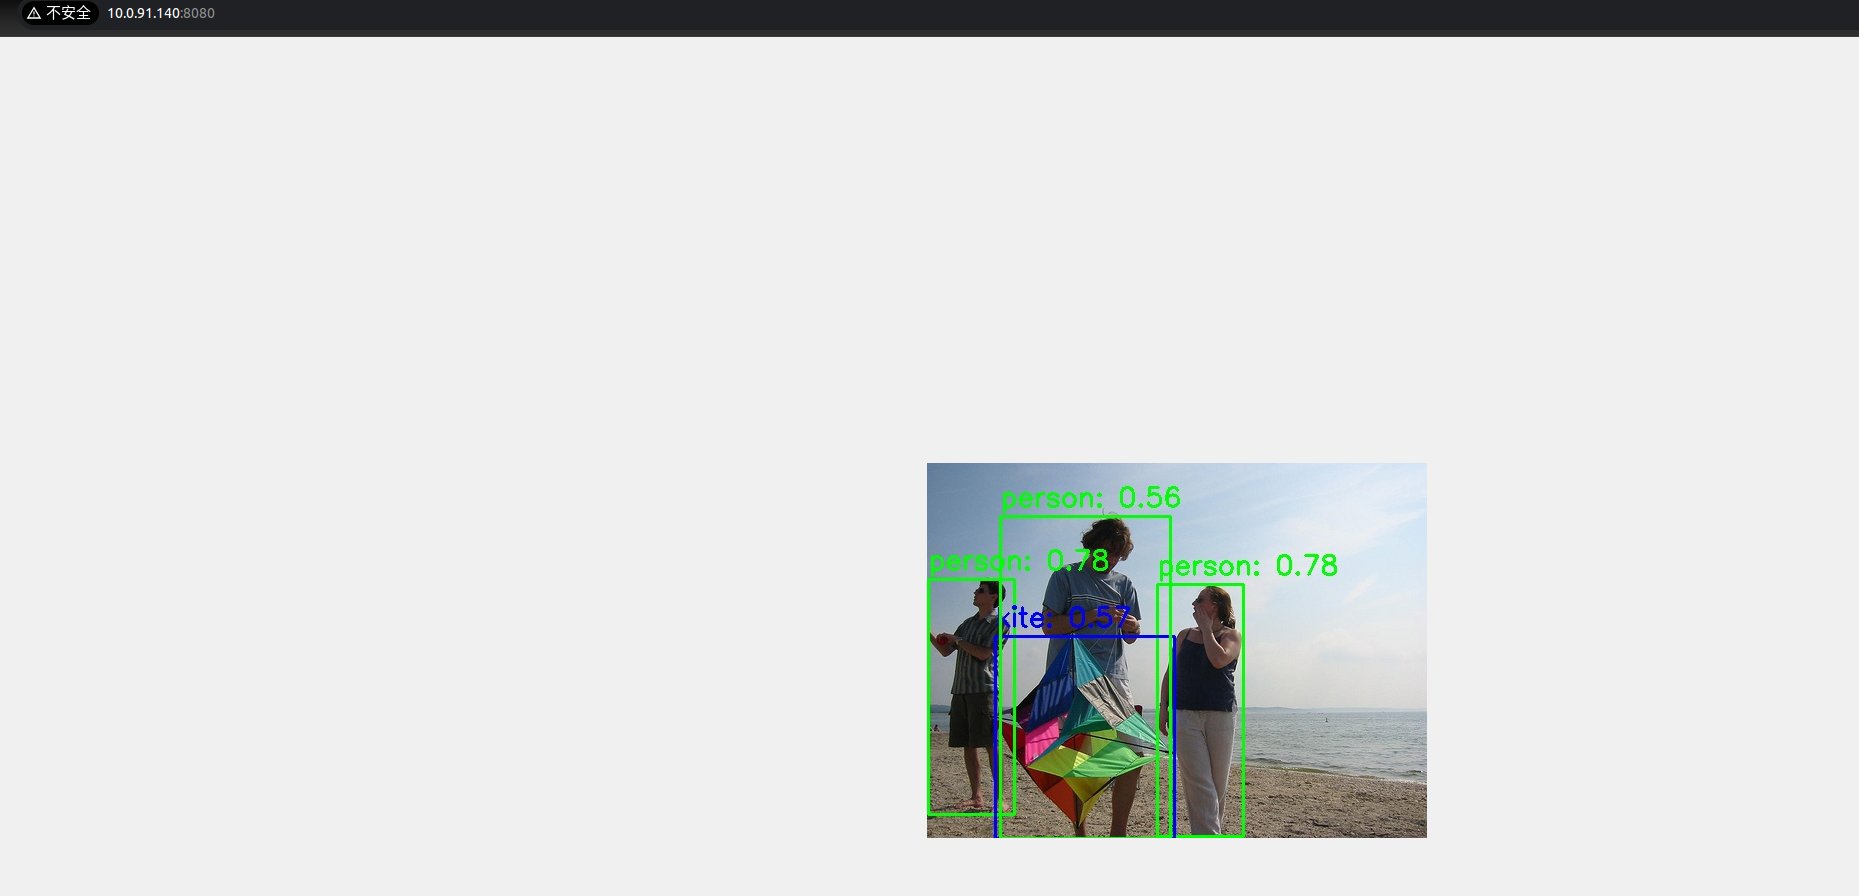
Open a browser and visit http://<IP>:8080 to see annotated results live.
Message Subscription and Monitoring
Check Topic Data
Inference results are published to the /inference_result topic. Use the following commands to monitor the output:
ros2 topic echo /inference_result
Example output:
header:
  stamp:
    sec: 1745571001
    nanosec: 597668762
  frame_id: camera_link
results:
- x_min: 109
  y_min: 99
  width: 149
  height: 316
  label: bottle
  conf: 0.4000000059604645
- x_min: 270
  y_min: 209
  width: 150
  height: 249
  label: bottle
  conf: 0.4000000059604645
- x_min: -1
  y_min: 424
  width: 326
  height: 55
  label: sink
  conf: 0.30000001192092896
---
Check Message Format Definitions
ros2 interface show jobot_ai_msgs/msg/DetectionResultArray
Message Structure Example:
std_msgs/Header header
    builtin_interfaces/Time stamp
        int32 sec
        uint32 nanosec
    string frame_id

jobot_ai_msgs/DetectionResult[] results
    int32 x_min
    int32 y_min
    int32 width
    int32 height
    string label
    float32 conf
Python Subscription Example
from rclpy.node import Node
from std_msgs.msg import Header
from jobot_ai_msgs.msg import DetectionResultArray, DetectionResult
import rclpy

class DetectionSubscriber(Node):
    def __init__(self):
        super().__init__('detection_sub')
        self.subscription = self.create_subscription(
            DetectionResultArray,
            '/detections',
            self.listener_callback,
            10)

    def listener_callback(self, msg: DetectionResultArray):
        self.get_logger().info(f"Frame: {msg.header.frame_id}")
        for det in msg.results:
            self.get_logger().info(
                f"[{det.label}] ({det.x_min},{det.y_min}) "
                f"{det.width}x{det.height} conf={det.conf:.2f}"
            )

def main(args=None):
    rclpy.init(args=args)
    node = DetectionSubscriber()
    rclpy.spin(node)
    node.destroy_node()
    rclpy.shutdown()

main()
infer_img.launch.py Parameters
| Parameter | Description | Default |
|---|---|---|
config_path | Path to the model configuration file used for inference | config/detection/yolov6.yaml |
img_path | Path to the image file to run inference on | data/detection/test.jpg |
publish_result_img | Whether to publish the detection result as an image message | false |
result_img_topic | Topic name for rendered image output (only valid if publish_result_img = true) | /result_img |
result_topic | Topic name for the inference result message | /inference_result |
Video Stream Inference
Start the Camera (USB Example)
ros2 launch br_sensors usb_cam.launch.py video_device:="/dev/video20"
Option 1: Inference with Web Visualization
Terminal 1 — Run inference:
ros2 launch br_perception infer_video.launch.py \
  config_path:='config/detection/yolov6.yaml' \
  sub_image_topic:='/image_raw' \
  publish_result_img:=true \
  result_topic:='/inference_result'
Terminal 2 — Start WebSocket visualization:
ros2 launch br_visualization websocket_cpp.launch.py image_topic:='/result_img'
Terminal prompts access address:
...
Please visit in your browser http://<IP>:8080
...
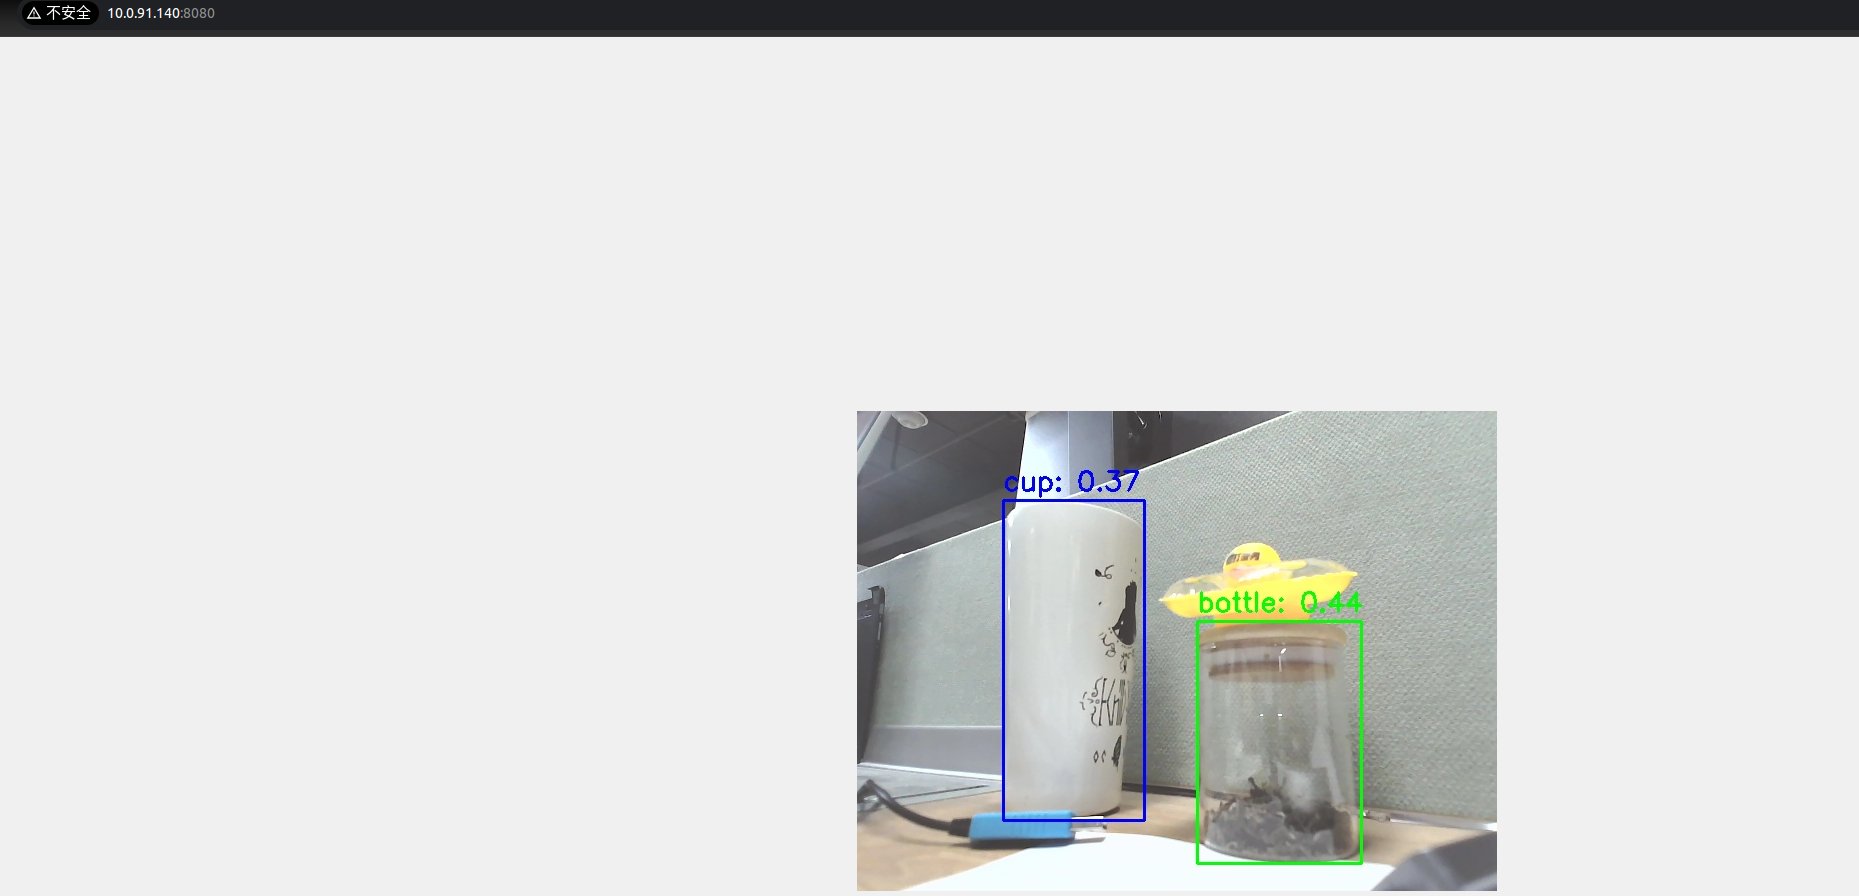
Open a browser at http://<IP>:8080 to view the inference results in real time:
Option 2: Inference without Visualization (Data Only)
To obtain raw inference results without visualization, execute:
ros2 launch br_perception infer_video.launch.py \
  config_path:='config/detection/yolov6.yaml' \
  sub_image_topic:='/image_raw' \
  publish_result_img:=false \
  result_topic:='/inference_result'
Obtain data through the ros2 topic echo /inference_result topic.
Message Subscription and Viewing
Print /inference_result topic data
ros2 topic echo /inference_result
header:
  stamp:
    sec: 1745571001
    nanosec: 597668762
  frame_id: camera_link
results:
- x_min: 109
  y_min: 99
  width: 149
  height: 316
  label: bottle
  conf: 0.4000000059604645
- x_min: 270
  y_min: 209
  width: 150
  height: 249
  label: bottle
  conf: 0.4000000059604645
- x_min: -1
  y_min: 424
  width: 326
  height: 55
  label: sink
  conf: 0.30000001192092896
---
To check message format:
ros2 interface show jobot_ai_msgs/msg/DetectionResultArray
Structure:
bianbu@bianbu:~$ ros2 interface show jobot_ai_msgs/msg/DetectionResultArray
std_msgs/Header header
    builtin_interfaces/Time stamp
        int32 sec
        uint32 nanosec
    string frame_id

jobot_ai_msgs/DetectionResult[] results
    int32 x_min
    int32 y_min
    int32 width
    int32 height
    string label
    float32 conf
Python Subscription Example
from rclpy.node import Node
from std_msgs.msg import Header
from jobot_ai_msgs.msg import DetectionResultArray, DetectionResult
import rclpy

class DetectionSubscriber(Node):
    def __init__(self):
        super().__init__('detection_sub')
        self.subscription = self.create_subscription(
            DetectionResultArray,
            '/inference_result',
            self.listener_callback,
            10)

    def listener_callback(self, msg: DetectionResultArray):
        self.get_logger().info(f"Frame: {msg.header.frame_id}")
        for det in msg.results:
            self.get_logger().info(
                f"[{det.label}] ({det.x_min},{det.y_min}) "
                f"{det.width}x{det.height} conf={det.conf:.2f}"
            )

def main(args=None):
    rclpy.init(args=args)
    node = DetectionSubscriber()
    rclpy.spin(node)
    node.destroy_node()
    rclpy.shutdown()

main()
infer_video.launch.py Parameters
| Parameter Name | Description | Default Value |
|---|---|---|
config_path | Path to the model configuration file for inference | config/detection/yolov6.yaml |
sub_image_topic | Image topic to subscribe to | /image_raw |
publish_result_img | Whether to publish the rendered inference image | false |
result_img_topic | Image topic to publish (only when publish_result_img=true) | /result_img |
result_topic | Inference-result topic to publish | /inference_result |