6.4.6 Dynamic Object Following
Last Version: 12/09/2025
Overview
This guide demonstrates how a real robot equipped with a SpacemiT RISC-V board can use on-board AI vision to detect a person and perform Navigation2 dynamic following.
SpacemiT RISC-V platform offers four reference solutions for person-following:
| Item | yolov6 follow | nanotrack follow | bytetrack follow | yolov8pose follow |
|---|---|---|---|---|
| Detector | yolov6 | yolov6 (init only) | yolov8 | yolov8-pose |
| Person Tracker | — | nano-track | byte-track | — |
| Position Estimation | bounding-box triangulation | bounding-box triangulation | bounding-box triangulation | key-point triangulation |
| Dynamic Follow | follow_point | follow_point | follow_point | follow_point |
| CPU Load | low | medium | high | medium |
| Memory Footprint | low | medium | high | medium |
Preparation
- Flash the SpaceMiT board with Bianbu Desktop 24.04 and install the Bianbu Robot SDK.
- Install ROS 2 Humble and the Bianbu Robot SDK on the PC.
Usage Guide
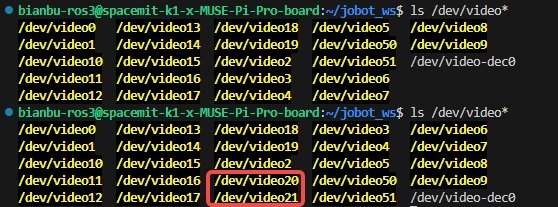
Configure the USB Camera Sensor
Plug / unplug the camera’s USB connector, then run the following command to check the newly added device port which is the camera input port.
ls /dev/video*
Example output:
Install Navigation2
Install Navigation2 and its bringup package:
sudo apt install ros-humble-navigation2
sudo apt install ros-humble-nav2-bringup
Launch the Camera Detection Node
Run the following command to start the USB camera. Replace the port number with the actual camera port number you just identified.
source /opt/bros/humble/setup.bash
ros2 run jobot_usb_cam jobot_usb_cam_node_exe --ros-args -p video_device:=/dev/video20
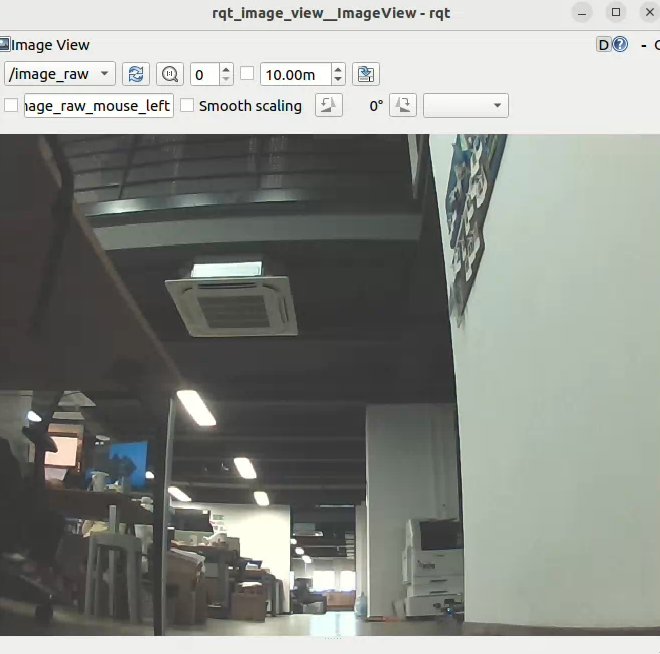
To view the camera image on the PC, open a new terminal and run:
source /opt/ros/humble/setup.bash
ros2 run rqt_image_view rqt_image_view
Example output:
Once the above setup is complete, you can choose one of the four person-following solutions to implement dynamic follow behavior.
Note: Unless specified otherwise, the following steps should be executed directly on the SpacemiT board terminal.
Detection, Tracking & Position Estimation
Each of the four schemes below can independently realize person-following; pick the one that best fits your needs.
Solution 1: yolov6 Detection & Follow
This solution uses yolov6 to detect a person and obtain their bounding box, calculates the person’s position from the bounding box and preset parameters, and implements dynamic following using the navigation2 follow_point behavior tree.
Step 1: Launch the vision-inference node
Run the following command to start the yolov6 vision inference node. This node continuously detects and classifies people in the images captured by the camera.
-
In Terminal 1, run:
source /opt/bros/humble/setup.bash
ros2 launch br_perception infer_video.launch.py config_path:='config/detection/yolov6.yaml' sub_image_topic:='/image_raw' publish_result_img:='true' result_topic:='/inference_result' -
Launch the visualization node in Terminal 2 by running:
source /opt/bros/humble/setup.bash
ros2 launch br_visualization websocket_cpp.launch.py image_topic:='/result_img'
Example output:
[INFO] [launch]: Default logging verbosity is set to INFO
[INFO] [websocket_cpp_node-1]: process started with pid [276081]
[websocket_cpp_node-1] Please visit in your browser: 10.0.90.219:8080
[websocket_cpp_node-1] [INFO] [1745548855.705411901] [websocket_cpp_node]: WebSocket Stream Node has started.
[websocket_cpp_node-1] [INFO] [1745548855.706897013] [websocket_cpp_node]: Server running on http://0.0.0.0:8080
[websocket_cpp_node-1] [INFO] [1745548856.281858684] [websocket_cpp_node]: WebSocket client connected.
In the websocket_cpp terminal you’ll see a line like:
[websocket_cpp] Please visit in your browser: http://10.0.90.219:8080 -
On your PC, open a browser and visit
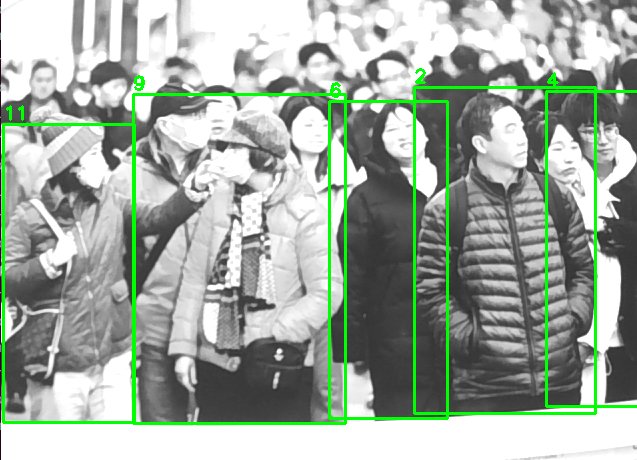
http://10.0.90.219:8080(IP may vary) to view the inference results as example below:
Step 2: Launch the Dynamic-Target-Updater Node
-
Open a new terminal (Terminal 3) and run the following command to start updating and dynamically following the target node.
source /opt/bros/humble/setup.bash
ros2 launch nav_goal_send goal_update_follow_point.launch.py
This node uses the AI vision module to detect the person's bounding box, calculates the target position, and updates the robot’s navigation goal. The updated target can also be visualized in rviz2.
-
Mount the camera at the front of the robot. Adjust the tilt angle appropriately—too small an angle may reduce YOLO’s detection accuracy.
-
Open the parameter configuration file
/opt/bros/humble/share/nav_goal_send/config/params_follow_point.yamlTo have the example parameters as:
pixel_w: 640    # Image width in pixels
pixel_h: 480    # Image height in pixels
person_h: 1.7   # Person height (meters)
distance: 0.8   # Calibration distance
width: 0.6      # Calibration width
theta_h: 0.35   # Tilt reference height
theta_d: 0.76   # Tilt reference distance
Calibration Parameter Explanation
-
distance: The distance along the robot's forward (x) axis when the top of the person head aligns with the top of the camera’s field of view. -
width: The lateral (y-axis) distance when the person’s side aligns with the edge of the camera view atx = distance. -
theta_h: Reference height for calibrating the camera’s downward tilt. -
theta_d: Forward distance at which the reference object starts to appear at the bottom of the camera view.
Tip: For different camera mounting positions and tracking targets, adjust these parameters in the file based on actual measurements to ensure accurate position estimation.
-
Step 3: Launch Navigation2 Dynamic Target Following
Run the following command to start Navigation2 in follow_point mode. This mode continuously follows the target detected by the camera:
source /opt/bros/humble/setup.bash
ros2 launch br_navigation nav2_follow_point.launch.py
You can adjust the follow distance by modifying the distance parameter in the behavior tree file. The default value is 0.5 m, which is the minimum distance the robot maintains from the center of the target:
/opt/bros/humble/share/br_navigation/config/behavior_trees/follow_point.xml
Example:
<Sequence>
    <GoalUpdater input_goal="{goal}" output_goal="{updated_goal}">
    <RetryUntilSuccessful num_attempts="3" >
        <ComputePathToPose goal="{updated_goal}" path="{path}" planner_id="GridBased"/>
    </RetryUntilSuccessful>
    </GoalUpdater>
    <TruncatePath distance="0.5" input_path="{path}" output_path="{truncated_path}"/>
</Sequence>
Solution 2: Nanotrack Following
For this solution:
-
Detect and Track the Target
- Use a YOLO model to detect the target person and initialize the NanoTrack module.
- After initialization, NanoTrack continuously tracks the target and publishes bounding box data.
-
Estimate Target Position
- The target position is calculated from the bounding box using pixel values and calibration parameters.
-
Follow Dynamically
- Navigation2 follow-point behavior tree uses the calculated position to make the robot follow the target.
Step 1: Initialize Visual Tracking Node
The Nanotrack model requires initialization using the person bounding box detected by YOLO, which only needs to be performed once. After initialization, the tracking module will automatically track the target person.
-
After starting the camera node
jobot_usb_cam, run the following command to launch YOLO detection inference and obtain the initial person bounding box information:source /opt/bros/humble/setup.bash
ros2 launch br_perception infer_video.launch.py config_path:='config/detection/yolov6.yaml' sub_image_topic:='/image_raw' publish_result_img:='true' result_topic:='/inference_result_for_nanotrack' -
Run the following command to launch the Nanotrack visual tracking node:
source /opt/bros/humble/setup.bash
ros2 launch nanotrack_ros2 nanotrack.launch.py det_topic:='/inference_result_for_nanotrack' result_topic:='/inference_result' -
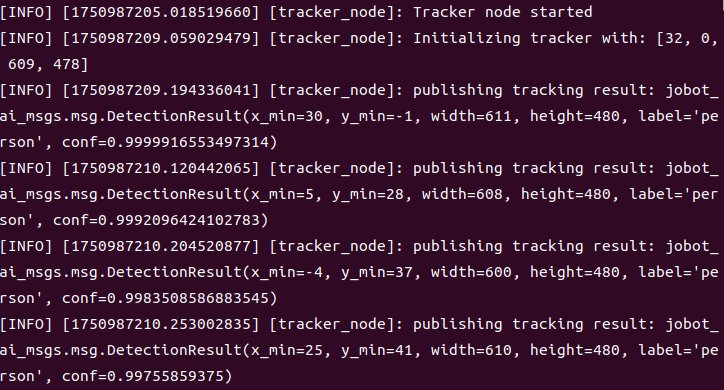
When the YOLO inference node detects reliable person detection, it will automatically initialize the Nanotrack module. The Nanotrack node is successfully initialized when the following continuous messages appear in its window:
-
After Nanotrack module initialization, you may terminate the YOLOv6 detection node by pressing Ctrl+C in its terminal.
Note: Nanotrack is a single-target tracking model. After initialization, ensure the target person remains in the camera's field of view to prevent tracking failure.
Step 2: Launch Dynamic Target Position Update Node
-
Open a new terminal and run the following command to start the node that updates the dynamic follow target:
source /opt/bros/humble/setup.bash
ros2 launch nav_goal_send goal_update_follow_point.launch.py
This node takes the bounding box data from the AI vision module, calculates the target person’s position, updates the robot’s navigation goal, and also visualizes the follow target in rviz2.
Refer to the Solution 1: yolov6 Detection & Follow section for adjusting target position estimation parameters. The configuration methods remain consistent and won't be repeated here.
Step 3: Launch navigation2 Dynamic Target Following
-
Run the following command to start Navigation2 in follow_point mode, which will continuously track and follow the target position detected by the camera:
source /opt/bros/humble/setup.bash
ros2 launch br_navigation nav2_follow_point.launch.py
Refer to the Solution 1: yolov6 Detection & Follow section for adjusting the following distance parameter configuration. The setup process remains identical and won't be repeated here.
Solution 3: ByteTrack Following
This solution uses ByteTrack for tracking. It requires running a YOLO person detection model continuously and supports multi-target tracking.
Step 1: Launch YOLOv8 Detection + ByteTrack Tracking Node
-
Install dependencies for ByteTrack detection
sudo apt install python3-scipy
sudo apt install python3-pip
sudo apt install python3-venv -
Create Virtual Environment and Install Python Dependencies
python3 -m venv ~/myenv
source ~/myenv/bin/activate
pip3 install lap cython_bbox
pip3 uninstall numpy
pip3 install numpy==1.26.4 -
Configure Environment Variables.
source /opt/bros/humble/setup.bash
export PYTHONPATH=~/myenv/lib/python3.12/site-packages:$PYTHONPATH -
After completing the above steps and launching the camera node
jobot_usb_cam, execute the following command in the terminal to start the YOLOv8n detection node + ByteTrack tracking node:ros2 launch bytetrack_ros2 bytetrack.launch.py result_topic:='/inference_result'The ByteTrack scheme detects and tracks multiple targets simultaneously, and assigns a unique ID to each one.
Note: If a person leaves the camera’s field of view and later re-enters, the ID will change.
Step 3: Launch navigation2 Dynamic Target Following
-
Run the following command to start Navigation2 in follow_point mode, which will continuously track and follow the target position detected by the camera:
source /opt/bros/humble/setup.bash
ros2 launch br_navigation nav2_follow_point.launch.py
Refer to the Solution 1: yolov6 Detection & Follow section for adjusting the following distance parameter configuration. The setup process remains identical and won't be repeated here.
Solution 4: YOLOv8Pose Following
This solution is for standardized person key-point detection + key-point triangulation + following.
Compared with the pure bounding-box estimation in YOLOv6, this method yields a more accurate follow-target position.
Step 1: Camera Extrinsic Calibration
For every different camera tilt angle you must re-calibrate the camera extrinsics.
-
Set the camera intrinsic parameters and chessboard size in:
/opt/bros/humble/share/nav_goal_send/nav_goal_send/track_chessboard.pyExample:
# load camera intrinsics
file_dir = get_package_share_directory('nav_goal_send')
yaml_path = os.path.join(file_dir, 'config/mono_params_k1.yaml')
with open(yaml_path, 'r') as f:
  data = yaml.safe_load(f)
K_compact = data['Camera']['K']  # [fx, fy, cx, cy]
D = np.array(data['Camera']['D'])  # distortion coefficients

# checkerboard dimensions
pattern_size = (8, 6)
square_size = 0.025
Intrinsic parameters are pre-calibrated and stored in:
/opt/bros/humble/share/nav_goal_send/config/mono_params_k1.yamlExample:
Camera:
  K: [603.664482, 603.032498, 323.936504, 210.723506]
D: [-0.458825, 0.233490, 0.000000, 0.000000] -
Run the file
track_chessboard.pyto calibrate the camera extrinsics (Rcam2car).python3 /opt/bros/humble/share/nav_goal_send/nav_goal_send/track_chessboard.py -
The results are automatically saved in the YOLOv8Pose parameter file:
/opt/bros/humble/share/nav_goal_send/config/params_pose.yaml
Step 2: Launch YOLOv8Pose Tracking Node
-
After the camera is up, start the YOLOv8Pose tracking node with:
source /opt/bros/humble/setup.bash
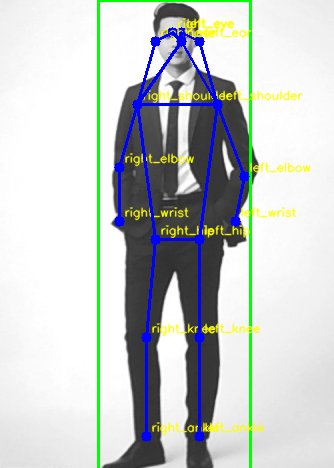
ros2 launch yolov8pose_ros2 yolov8pose.launch.py result_topic:='/inference_result'The YOLOv8Pose node detects the person and maps joint information to the corresponding key-points. Key-point list:
  KP_NAMES = [
      "nose", "left_eye", "right_eye", "left_ear", "right_ear",
      "left_shoulder", "right_shoulder", "left_elbow", "right_elbow",
      "left_wrist", "right_wrist", "left_hip", "right_hip",
      "left_knee", "right_knee", "left_ankle", "right_ankle"
] -
The person’s key-points and their corresponding names can be collected in the camera view.
Step 3: Launch the key-point triangulation node for follow-target position
-
Once the camera extrinsics are calibrated, start the key-point triangulation node to compute the follow-target position.
source /opt/bros/humble/setup.bash
ros2 launch nav_goal_send goal_update_pose.launch.py
The node uses the YOLOv8Pose key-points to triangulate the target, continuously updates the robot’s navigation goal, and visualizes the follow-target in Rviz2.
-
Open the following parameter configuration file. For different camera mounting positions, the camera extrinsic parameters need to be recalibrated. You can also adjust the preset parameters for following the target person.
/opt/bros/humble/share/nav_goal_send/config/params_pose.yamlExample:
goal_update_pose_node:
  ros__parameters:
    Rcam2car:
    - 0.9983763694763184
    - 0.03929898142814636
    - -0.04123289883136749
    - -0.04364486411213875
    - 0.9929260611534119
    - -0.1104220449924469
    - 0.03660174459218979
    - 0.1120423674583435
    - 0.9930291175842285
    person_h: 0.6 # Person height (nose-center)
Calibration Parameter Description
-
Rcam2car: The calibrated camera extrinsic matrix; every time the camera tilt is adjusted, this matrix must be re-calibrated. -
person_h: The reference real-world height between person key-points, defined as the vertical distance from the nose key-point to the center key-point (mid-point of left_hip and right_hip).
-
Step 4: Launch Navigation2 Dynamic Target Following
-
Run the following command to start Navigation2 in follow_point mode, which will continuously track and follow the target position detected by the camera:
source /opt/bros/humble/setup.bash
ros2 launch br_navigation nav2_follow_point.launch.py
Refer to the Solution 1: yolov6 Detection & Follow section for adjusting the following distance parameter configuration. The setup process remains identical and won't be repeated here.
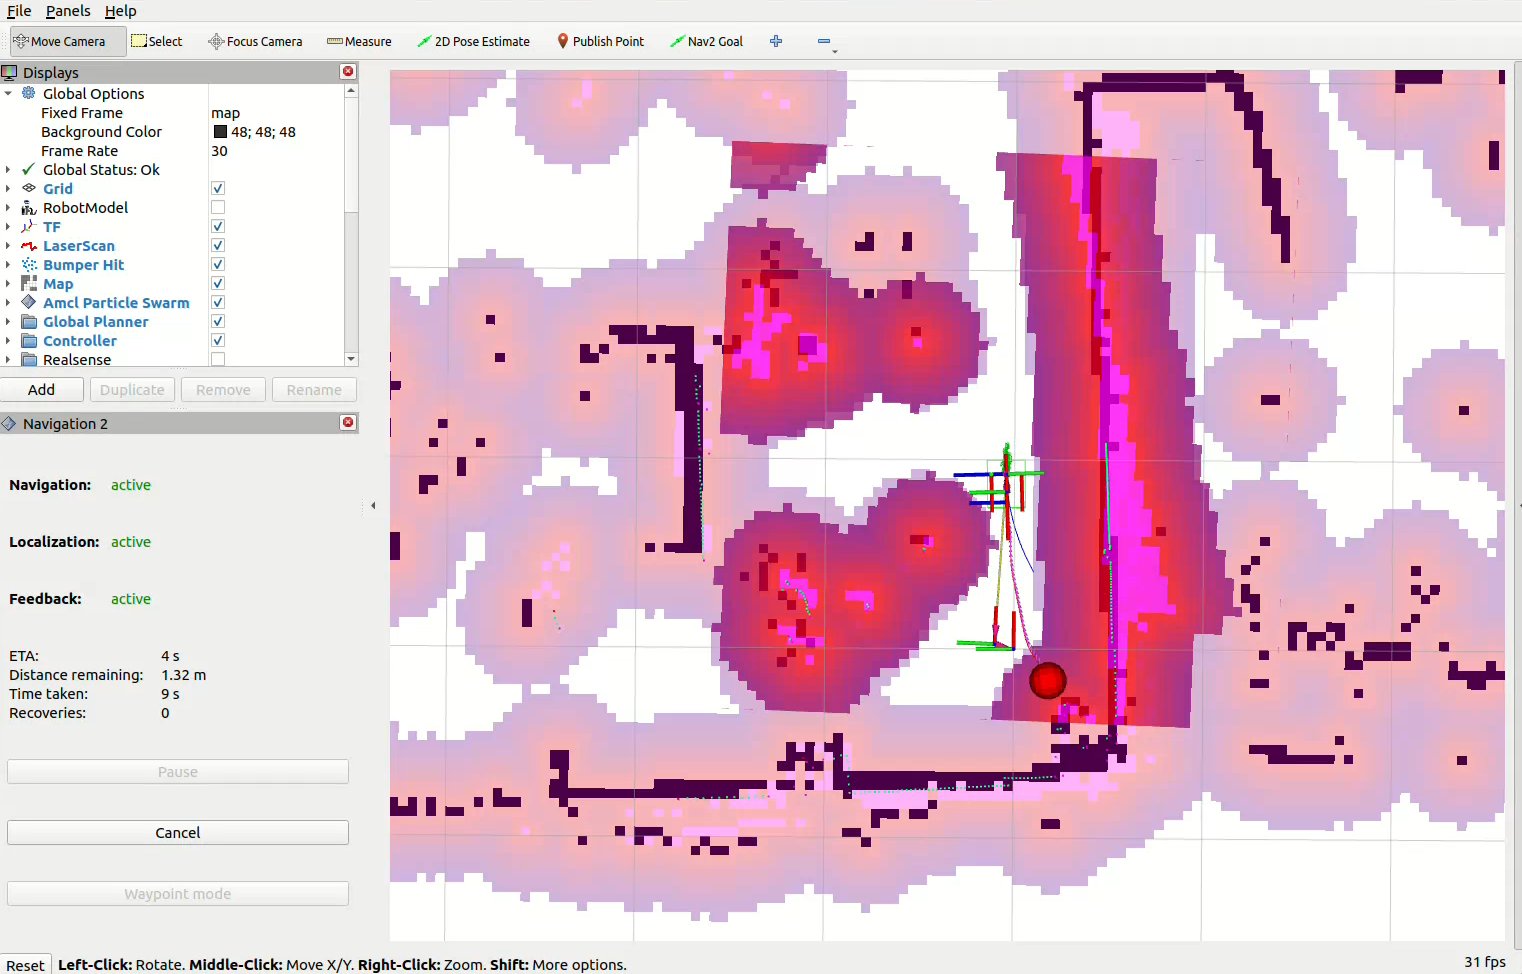
Visualize Dynamic Following on the PC
After starting any of the AI detection & tracking solutions, ou can visualize the dynamic following on a PC using rviz2 in real time.
-
Open a new terminal on the PC and run the following commands to launch rviz2:
source /opt/ros/humble/setup.bash
source ~/ros2_demo_ws/install/setup.bash
ros2 launch br_visualization display_navigation.launch.py -
As shown below, click Add → choose Marker under the
/visualization_markertopic.
-
You will now see the detected person in the rviz2 window. The red point represents the calculated follow target position:

-
Click 2D Nav Goal to set any navigation target. Once set, Navigation2 follow mode will start. As the target moves, the robot will continuously follow it automatically: